Showing posts with label Trash To Treasure. Show all posts

Sunday, June 12, 2011

Feathered Friends & A Little Project

Hope everyone is having a great weekend!  I've been spending a lot of time out in the yard and have had a chance to do some bird watching.  They've been really active with the nice weather!  And there's a nest in one of our apple trees that is super cool.  Here are a few shots.


My husband actually saw mom feeding the little baby birds.  I was hoping to get a picture of that... but not yet.  Mama is protective!


I'm amazed I actually got this one!... This fella had a hay-day out on the front lawn!


Okay, so now for the project.  I had this old bird feeder and one of the plastic inserts broke in it. 


Nothin that a little spray paint and creativity won't fix!  I simply removed the plastic inserts (they slid right out of the top).  Then I busted out a mixture of brown and black spray paint.  I put a coat of brown on first and let it dry.  Then I used black over the top of that... but before it had a chance to dry I used an old cloth and rubbed some of it off.  Then I added a little extra distressing by lightly sanding off a few areas.

Once that was done, I took the old inserts and used them as a template to create the new ones.  I decided to put chicken wire in where the plastic used to be.  I simply used wire snippers and cut out the rectangles, then assembled them on the inside.  I put a candle in it and voila!


This was so simple!... and FREE!  Plus super fun and cute to use as an accent or centerpiece for an outdoor party.  Have a fabulous week!


Friday, April 29, 2011

2 For 1 Friday ~ Candle Lantern/Basket Planter

TGIF everyone!  Glad I'm able to get this post on here today even if it's a little late in the day.  Things didn't go according to plan when I started my project for 2 For 1 Friday.  I originally wanted to do a little side table for my Front Porch Perk Up.... but that didn't turn out even close to what I imagined in my head.  Don't ya just love days like that? 

Anyway, I brainstormed a few other possibilities and decided that this is a fun, cute springy idea that is super cheap and so easy anyone can do it and I'm sure you wouldn't even have to go and buy anything!  Just look around and raid your stash and you can totally throw this little project together.

Mine started off with a little basket I got at the thrift store for 50 cents. 


I cut the orange straps off with a razor knife cause they HAD to go!  Then I sprayed on a coat of primer, and used a green spray paint over that.  Once that dried I used some brown paint and dabbed some on in random places to create kind of a rust look on it. 

Then I put some decorative rocks in the bottom.  I have a bunch of these around my house, but they also sell them at the dollar store if you want some on the cheap.

Anyway, easy easy, that's why there's no pics of that process.  ANYONE can spray paint right!?

So for the first way to use this I decided to put a glass candle votive directly in the center and layer the rocks all around it.


The candle votive was one I already owned.


For the second way I used this, I simply swapped out the candle for a small decorative planter.  This is also something I had at home, and just re-purposed in a fun new way.


This would also look really cute with a bird and nest inside, or a small garden statue... maybe a little Buddha would be cute!

Anyway, it's a quick and simple project that cost almost nothing!  Have a great weekend :)


Born to Party!  Click here to link back to one of the great parties I join each week... and thanks for stopping by!

Sunday, April 17, 2011

Thrifty Spring Planting Idea's by Guest Blogger

Hello! I'm Jennifer's Mom Marie.  Her computer crashed last week and is still in the shop.  She asked me to let you know that she'll be back online next week. In the meantime, she wanted me to post a couple of my thrift store finds and what I like to do with some of my unique treasures.  I've never blogged before, so here goes!  I'm also a thrift store junkie and have been going for... well lets just say a very long time, long before it became so popular.

I pick up ornamental birdcages for a few bucks when I can find them and love to put a fern or other happy trailing plant in them using unusual pots that I find on my travels.  I have some inside year round and also use them outside during the summer, they look pretty cute on my front porch, deck and patio.


Most seem to have some sort of rather ugly fake dusty plant in them.
Guess that used to be popular?


This cute cage was stuffed full of this artificial plant, which camouflaged it so well it made it almost impossible to see the detail in the cage.  Must be why nobody else saw it's potential and passed it by.  


I'm planning on painting it a lovely rust color. I love Rust! But that's a whole nother story! I'll need to get some tips from Jen on her painting techniques.


I love how this thrift store rustic pot turned out planted with a happy Spearpoint Ivy that will fill out with time. It made the perfect Birthday gift for my daughter-in-law.


Sitting on a metal rusty plant stand really seem to compliment one another.


For some reason I've been on a kick lately of collecting old teapots and kettles to plant outside this spring. I scored some really good deals on eBay and from our local thrift stores.  I have several ideas of what I'd like to do with them, now I just need some ambition and warmer weather to put my plans in action.  I'm thinking of hanging them from rustic plant hangers mounted on a 6' weathered, distressed post so they tip like they are pouring from their spouts with carefree flowing flowers.  Unless I can make them into a solar powered fountain, that could be an entertaining project.  Or perhaps just hang them on my old wooden fence or set them on an old tree stump.  Since they are metal they will get pretty hot in direct sunlight, so I will have to keep that in mind where I place them and also what types of plants will survive in them.  We've had an unusually long cold winter and wet snowy spring, so I'm extremely anxious to get outside.  I have lots of garden projects waiting for me! If they turn out I'll have Jen post them.  Thanks for looking!


Click here to link back to one of the great parties joined each week!

Tuesday, April 5, 2011

Outdoor Rustic Star

Hey!  Hope everyone had a good weekend.  It snowed here on Sunday and has been cold and gloomy.  Two days prior to that temps were in the 70's.  That's Utah weather for you!  Just when you think spring has sprung, winter rears it's ugly head!

Anyway, sorry I've been a little MIA lately.  I've had some major stuff going on (more on that later) and have been busy prepping for some big projects involving a ton of yard work.  And with that, my time has been totally consumed.  But in between everything I've found a little time to do a little crafting! 

A few weeks back I found this star at the thrift store for $1.50.  I have the perfect place for it on my front porch (if the weather ever shapes up!) but it just needed a little paint makeover.


I started with a basic black paint and gave it two good coats.


After that, I got a little overanxious to get it done... and just starting adding my own mix of colors and glazes until it looked "right".  I really had no rhyme or reason to my madness... in fact I don't even remember the order of colors or which one I mixed with what.  That's the beauty of paint... you can customize your own look and play around with the desired effect.  

I used a combination of browns, black and yellow applying each one individually and letting dry... then adding a little more of something here and there.  Here's the closeup (sorry, the pics from far away are hard to see the detail).


I'm not sure if this is it's final resting place on the porch... I still need to get all my other stuff out and play around with it.  I also need to do something with the whiskey barrel ~ maybe some stain or paint?  I'll see how I feel once it's warm enough to get out there!


I can't wait to put it all together!  If you want the names of colors that I used just shoot me a message and I can respond.  I basically used what I already had.  Just by mixing different colors until you create a new one that works for your project is the perfect way to use what you have. 

I'll have another cute little paint makeover on Thursday so check back to see that!

Click here to link back to one of the great parties I join each week. Thanks!


Wednesday, March 23, 2011

Old World Candlesticks

First of all, let me apologize in advance for the HORRIBLE pictures.  My (almost 3 year old) curious son got a hold of our digital camera to partake in some wildlife photography of some cheerful birds out on the front lawn.  Well he got a little overzealous and dropped it right on the lens.  Needless to say it took a $*!% and now I'm in need of a new one.  My husband (the handyman) did the best he could to try and fix it, not knowing a thing about camera lens repair.  So now in order to use it, I have to manually pull the lens out every time I turn it on.... and it sure doesn't want to focus in on anything.  Anyway, I'll work on getting a new one.... GRRRRRR!  But for now here's a little project I just finished up.

If you saw my Thrifty Finds post from a few days ago, you saw these little $4 beauties just waiting for some painting love.


If you've seen any of my previous glazing techniques, you know I'm all about layering.  It's pretty simple really... I started with a base coat of pure white.  Actually I sprayed some white primer on and left it as is.  I didn't have any white spray paint, and I'm too cheap (and lazy) to go and get some. 

Anyway, once the primer was dry, I applied some Valspar color glaze in Raw Umber using a brush and just working it into the crevices.  I let dry overnight. 

Next I used some plain black paint and took my sons water color paint brush and applied small amounts in the cracks and crevices working in sections.  Before each section dried, I took a dry brush and dabbed, dabbed, dabbed the paint around.  (Notice there are no pictures of this process!)..... (hmmmm, wonder why?)  Anyway, then I just wiped off a few areas to allow some of the white to show through.

Here you go.... Old World Candlesticks!


I still need to spray some satin poly sealer on them to give a protective coat.  But that will have to wait til the weather cooperates and the wind stops blowing.  (That's another saga!) :)

Again, I'm sorry about the blurry pics.  If anyone has a suggestion on what brand/type of camera to purchase, I'd greatly appreciate it.  I'm not too savvy on the technical stuff.  Just as long as it works good and is toddler proof.  Okay that might be too much to ask for.  I'll just be more careful of putting it up and out of arms reach!

And as always, I was born to party.  Click here to link back to all the FANTASTIC parties I join each week.  

Friday, March 11, 2011

2 For 1 Friday ~ Mod Podge & Paint/Pier 1 Knockoff

Are you like me and have 50 projects just waiting for your attention?  You've scored a good find, have a plan of action, and have every intention of getting to it at some point in time... but then someone beats you to the punch!  DANG!  Well, it happens.  There are a lot of creative people out there in blog land.  But then again, great minds think alike, right?  And I'm sure things have been repeated in one way or another... but when you see a similar idea posted by someone else before you get a chance to display your creation, you just can't help but feel a little behind.  Well it happened to me folks.  That's okay, this is all part of the game.  And part of sharing our ideas!  I think that's why we blog about what we've created anyway... share the wealth right?  More on that later.

Anyway, this project is a decorative plate I found at the thrift store.  I saw one at Pier 1 Imports that I absolutely adored!  But with a price tag of $130 I didn't have the means to go out and buy it at the time. 


Isn't it so great?


Anyway, during one of my many thrifting outings... with my mom of course!... I scored this baby for $4!


I knew it had some killer potential.  It's quite large and heavy duty... plus the price was right.  So I didn't hesitate to snatch it up.  I instantly came home and searched Pier One to remind myself of how great that piece was.  Okay, so now what?  How can I replicate it? 

I'm all about painting something to change the appearance... but I wanted to create the same look and I really didn't want to go out and buy anything else.  Use what you have right?  So after rummaging through all my stuff, there it was... TISSUE PAPER!  Now how can I glue it on there?  I've heard of Mod Podge although I had never used it before.  How hard could it be?  So off to Hobby Lobby.  I picked some up and brought it home.

Being a Mod Podge virgin I didn't really know what to expect... but then again do we ever going into a new project.  So I basically just went to town.


I spread the Mod Podge on the plate and laid the tissue paper on top... smoothing it down as I went.  BTW this stuff doesn't smell the greatest!


It took 2 pieces of tissue.  After that was on I applied another coat of Mod Podge on top and left it to dry. 


Then I did what I do best.... glazing!  All of my glaze is Valspar.  I started with Raw Umber, then a custom mix of clear glaze and black paint (3 parts glaze to 1 part paint), and the final application of a metallic bronze.

Here's how it turned out!


Total cost:  $4 for the plate, tissue paper FREE, Mod Podge $7 (but I have SO MUCH leftover for MORE projects!!!) = $.050 for what I used for this project!), paint (already had) ~ $4.50.  Not bad compared to $130!!


Now back to the part where someone else has had a similar idea.  Check out this creation using the same tissue paper and Mod Podge by Creative Juices Decor

Thanks for stopping by, hope you all have a fabulous weekend! :)

Entering this project in this competition:


Saturday, February 19, 2011

Cheap and Easy Storage Solutions

In this unfavorable economy, and with just about everyone and everything going green, I've been trying to do my part by being less wasteful, more resourceful and to recycle, reuse and re-purpose.  It's amazing how much we actually throw away if you think about it.  So I've been looking at things with a different eye.


Here are just a few ideas for re-purposing old junk and garbage into cheap and easy storage solutions.


1)  Turn an old shoe box into a photo storage box.  It's basically already set up for you and this box had a cute design on it.  I simply used some coordinating stickers and ribbon to cover up the the logos.  My small albums and misc. picture books fit perfectly in it.  I know, now I'm getting all crafty on you... don't mind my messy table!


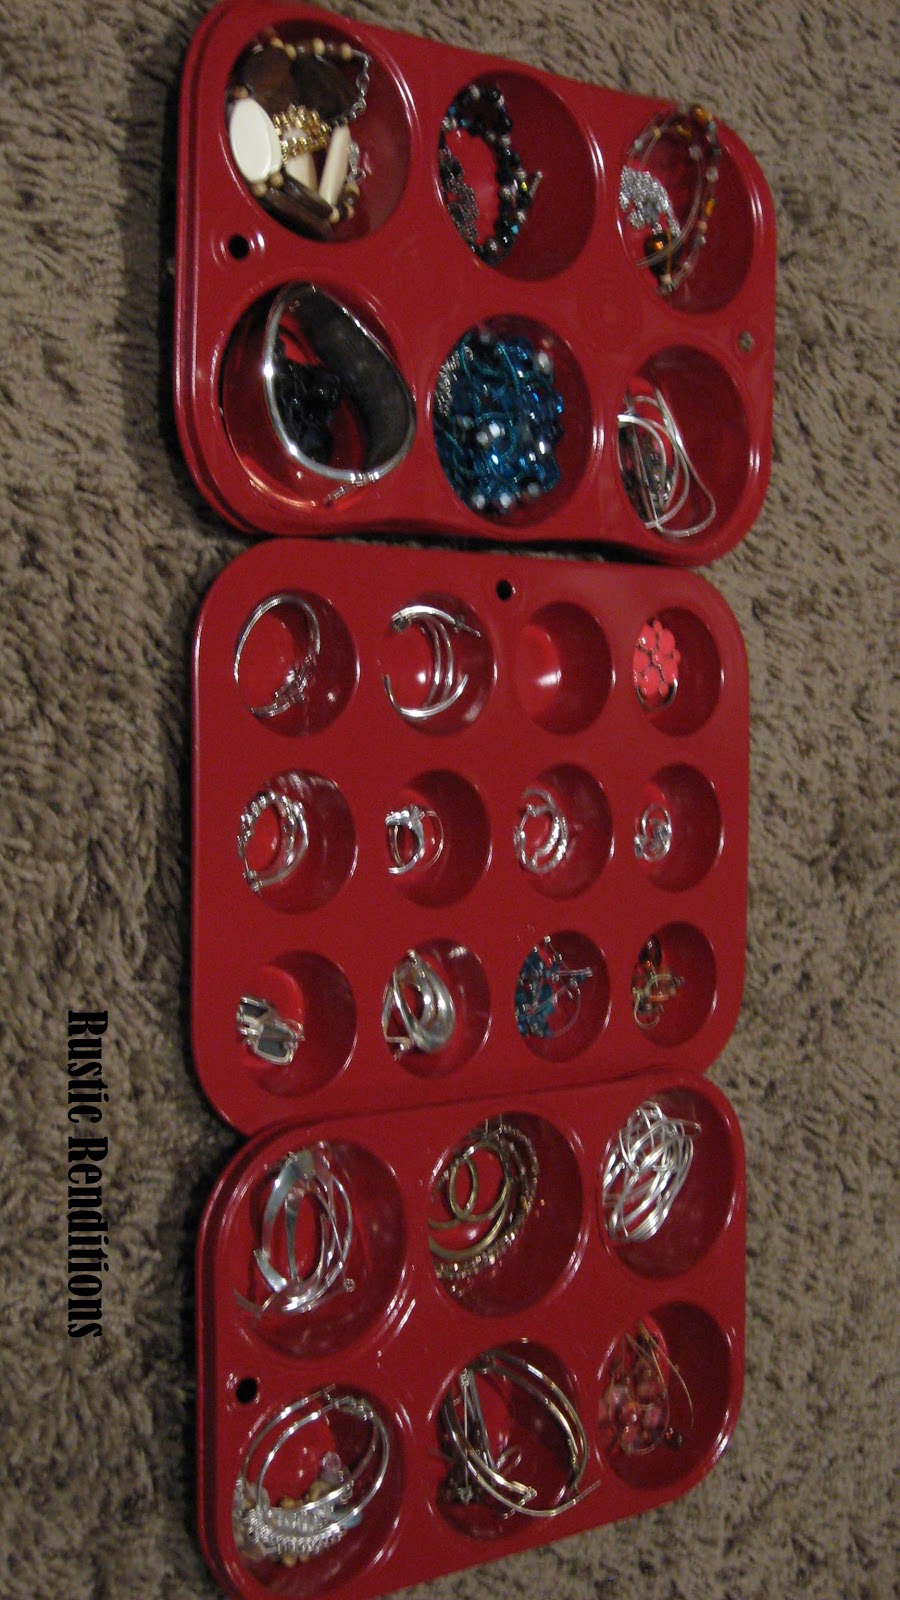
2)  Don't throw away your greasy old muffin tins!  Just wash em up, give em a coat of spray paint and the possibilities are endless.  I used these to store my jewelry.  The compartments are the perfect size, plus they stack up nice and neat to fit in a small drawer.  You could also use these in an office desk, a workbench out in the garage, in a craft room... just use your imagination!


(sorry about this sideways photo!)


3)  Baby food jars are the ideal storage solution for items you need to see clearly and easily.  I use these for scrap booking odds and ends, buttons, kids' crafts, and to store leftover mixed painting glaze that I know I'll reuse and don't want to waste.


4)  So this one you get to have some fun in the process!  Use empty wine or liquor bottles as decorative vases.  Some have beautiful colors and designs so why throw them away?  You could also use a collection as a pretty display on a window sill or on a shelf. 


5)  Mint tins are great for just about any small items you need to organize.  I used this one for all the many bobby pins I had cluttering up my bathroom drawers.  Safety pins, paper clips, and business cards are just a few other bits and pieces that would fit in here.  I love this idea because the lids on these babies snap tightly and you get some fresh breath in the process!


So next time you go to toss something out, give it a second thought.  Come up with some unique ideas to re-purpose those savable objects.  I would love to hear any ways that you are reusing your things too.  Send me a message or leave a comment.